Digital Single-Lens Reflex (DSLR) cameras are powerful tools that offer photographers the flexibility to capture stunning images with exceptional quality. However, for beginners, the plethora of buttons, settings, and features on a DSLR can be overwhelming. In this guide, we’ll break down the basics of how to use DSLR cameras, helping you unlock their full potential and elevate your photography skills.
Getting Started
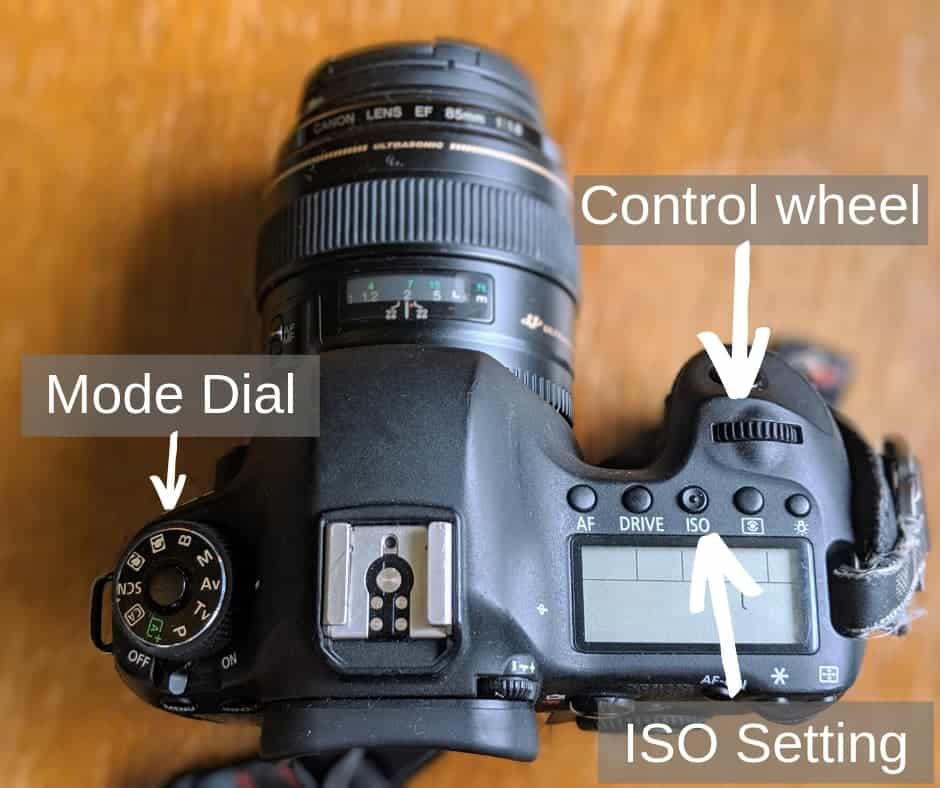
1. Familiarize Yourself with the Camera
Before diving into the various settings, take the time to get acquainted with the physical aspects of your DSLR. Identify the key components such as the lens, viewfinder, LCD screen, and buttons. Understanding the layout of your camera will make it easier to navigate and adjust settings on the fly.
2. Learn the Basics of Exposure
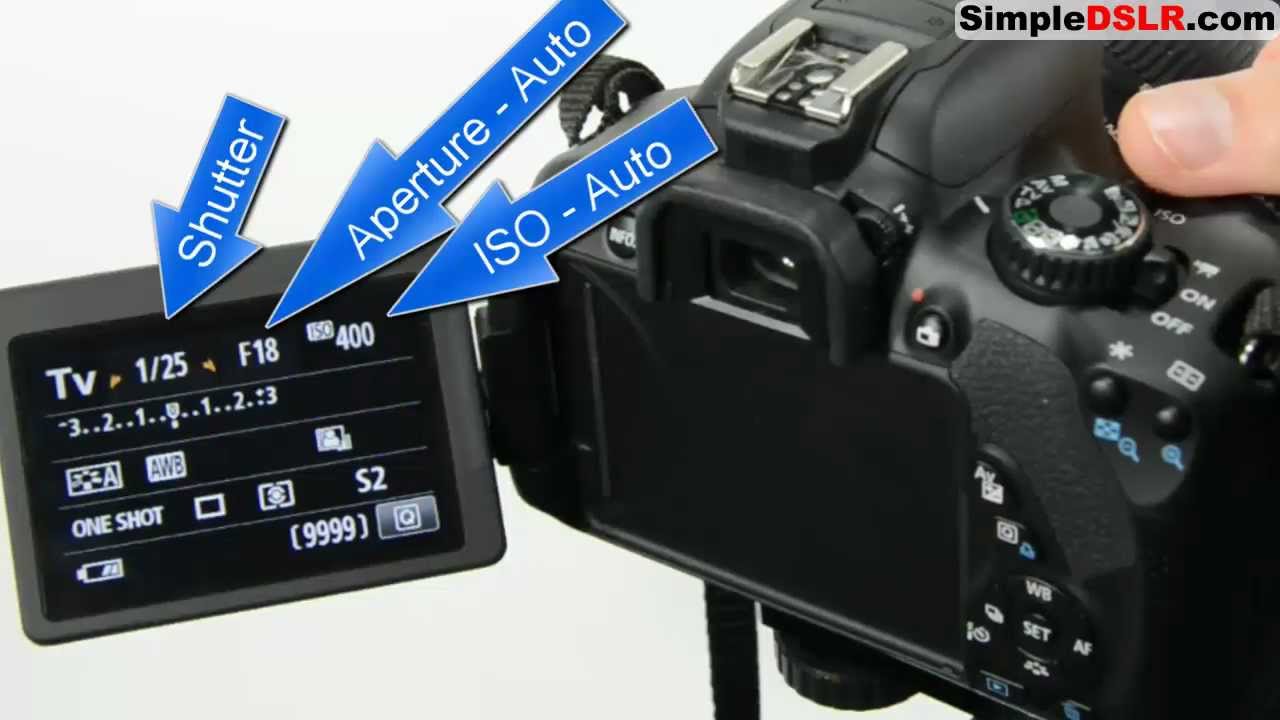
Exposure is a fundamental concept in photography, and understanding it is crucial for capturing well-balanced and visually appealing images. The three primary elements of exposure are aperture, shutter speed, and ISO. Familiarize yourself with these settings and how they interact to control the amount of light entering the camera.
Mastering Manual Mode
3. Aperture (f-stop)
The aperture, measured in f-stops, determines the size of the lens opening. A lower f-stop (e.g., f/2.8) results in a wider aperture, allowing more light to enter. This is ideal for low-light conditions or when you want a shallow depth of field for creative effects.
4. Shutter Speed
Shutter speed controls the duration the camera’s shutter remains open. A faster shutter speed freezes motion, while a slower speed captures motion blur. Experiment with different shutter speeds to achieve the desired effect in your photographs.
5. ISO
ISO measures the sensitivity of your camera’s sensor to light. A lower ISO (e.g., ISO 100) is suitable for well-lit conditions, while a higher ISO (e.g., ISO 1600) is useful in low-light situations. Be mindful of the trade-off between ISO and image quality, as higher ISO values can introduce noise.
Autofocus and Manual Focus
6. Autofocus Modes
Most DSLRs offer various autofocus modes, such as single-shot AF, continuous AF, and automatic AF. Single-shot AF is ideal for stationary subjects, while continuous AF is suitable for capturing moving subjects. Experiment with these modes to find the one that best suits your shooting scenario.
7. Manual Focus
While autofocus is convenient, there are situations where manual focus is preferable. Learn how to manually adjust the focus using the focus ring on your lens for more control, especially in challenging lighting conditions.
Composition Techniques
8. Rule of Thirds
The rule of thirds is a basic composition guideline that divides the frame into a 3×3 grid. Place key elements along these gridlines or at their intersections to create visually appealing and balanced compositions.
9. Framing and Leading Lines
Experiment with framing your subject within the environment or using leading lines to draw attention to the main focal point. These techniques can add depth and interest to your photographs.
Post-Processing
10. Explore Editing Software
While capturing a great shot is essential, post-processing can enhance your images further. Familiarize yourself with photo editing software like Adobe Lightroom or Photoshop to fine-tune exposure, color balance, and sharpness.
Video: How to Use a DSLR Camera? A Beginner’s Guide
How is a Dslr Camera Used?
A DSLR camera is a digital single-lens reflex camera. This type of camera uses a mirror system that directs light from the lens to the viewfinder when you’re taking a photo. When you press the shutter button, the mirror moves out of the way and allows light to hit the image sensor, which captures the image.
DSLR cameras offer many advantages over other types of cameras, including better image quality, more versatility, and greater control over your photos. One of the biggest advantages of a DSLR camera is that it offers much higher image quality than compact point-and-shoot cameras or even smartphone cameras. This is because DSLRs have large sensors that can capture more light and detail than smaller sensors.
In addition, DSLR cameras have interchangeable lenses so you can choose the best lens for each situation. For instance, you might use a wide-angle lens for landscape photography or a telephoto lens for wildlife photography. DSLR cameras also offer more creative control over your photos than other types of cameras.
This is because they allow you to adjust settings like aperture, shutter speed, ISO, and white balance to get the results you want. For example, if you want to create a shallow depth of field effect in your photo (where only part of the photo is in focus), you would need to use a low aperture setting like f/2.8 or lower. If you’re looking for more versatility in your photography, a DSLR camera is probably your best bet!
How Do I Take Pictures With Dslr?
Taking pictures with a DSLR camera can seem daunting for beginners, but with a basic understanding of key settings and some practice, you’ll be capturing stunning images in no time. Here’s a step-by-step guide on how to take pictures with a DSLR:
1. Power On Your DSLR:
Turn on your DSLR camera by flipping the power switch. Ensure that the battery is adequately charged to avoid interruptions during your photography session.
2. Select Shooting Mode:
DSLRs often have various shooting modes, such as Auto, Program, Aperture Priority (Av), Shutter Priority (Tv), and Manual (M). For beginners, starting with Auto or Program mode allows the camera to handle most settings while you focus on composition.
3. Insert a Memory Card:
Make sure there is a compatible memory card inserted into the camera. This is where your photos will be stored. Check the capacity of the card to ensure you have enough space for your intended shots.
4. Attach the Lens:
If you haven’t already, attach the lens to your camera by aligning the lens’s white or red dot with the corresponding dot on the camera body. Twist the lens gently until it clicks into place.
5. Set ISO:
Adjust the ISO setting based on the lighting conditions. A lower ISO (e.g., 100-400) is suitable for bright environments, while a higher ISO (e.g., 800-3200) is better for low-light situations. Keep in mind that higher ISO values may introduce more noise to the image.
6. Compose Your Shot:
Look through the viewfinder or use the live view mode on the LCD screen to compose your shot. Pay attention to the framing, rule of thirds, and any specific elements you want to include in the photo.
7. Set Aperture and Shutter Speed (in Manual Mode):
If you’re comfortable using manual mode, set the aperture (f-stop) and shutter speed according to your creative preferences and the lighting conditions. A wider aperture (lower f-stop) lets in more light and provides a shallow depth of field, while adjusting the shutter speed controls motion blur.
8. Focus the Lens:
Use the autofocus (AF) mode or manual focus (MF) to ensure your subject is sharp. Half-press the shutter button to let the camera focus, and then fully press it to take the shot.
9. Review and Adjust:
After taking a shot, review it on the camera’s LCD screen. Pay attention to exposure, focus, and composition. If necessary, make adjustments to settings or composition before taking more pictures.
10. Experiment and Learn:
Don’t be afraid to experiment with different settings, angles, and compositions. The more you practice, the more familiar you’ll become with your camera’s capabilities, allowing you to capture the images you envision.
Remember, taking great photos with a DSLR is a skill that develops over time. Be patient, explore the features of your camera, and enjoy the creative process of capturing memorable moments.
How to Use Dslr Camera for Video
Are you wanting to use your DSLR camera to record video? Whether you’re a professional videographer or YouTuber, or you just want to get started in videography, using a DSLR can help you take your videos to the next level. Here are some tips on how to use a DSLR camera for video.
First, make sure that your camera is in manual mode. This will allow you to have more control over things like aperture, shutter speed, and ISO. You’ll also want to set your white balance manually so that your colors are accurate.
Next, choose the right frame rate and resolution for your project. If you’re recording something fast-paced like sports or action, you’ll want a higher frame rate so that there’s less motion blur. For most other projects, 24-30 frames per second is fine.
As for resolution, 1080p is standard HD quality and should be plenty for most projects. 4K is only really necessary if you’re doing something professionally or if you plan on displaying your video on a large screen. Now it’s time to focus on getting good audio.
If possible, use an external microphone instead of the built-in one on your camera. This will result in much better sound quality. If you can’t use an external mic, try to keep the camera as close to the subject as possible so that the sound isn’t too echoey.
Finally, don’t forget about lighting! Good lighting can make all the difference in a video (and bad lighting can ruin it). Natural light is always best if possible, but if not then artificial lighting will do the trick.
Just make sure that whatever light source you’re using isn’t causing any weird shadows or flares in the shot. By following these tips, you can start shooting amazing videos with your DSLR camera!
Conclusion
Mastering the use of a DSLR camera takes time, practice, and a willingness to experiment. By understanding the basics of exposure, mastering manual mode, and exploring composition techniques, you can elevate your photography skills and capture images that tell compelling stories. Take the time to explore your camera’s features, and most importantly, enjoy the creative process of photography.
Related Post:
- Top 7 Best Sony Mirrorless Cameras ( Buying Guide )
- Top 5 Best Motion Activated Wildlife Cameras ( Fail-proof )
- 3 Best Binoculars for Elk Hunting