
DSLR cameras are a great way to take high-quality photos. However, they can be a bit daunting for beginners. Here are some tips on how to take photos on DSLR cameras.
First, make sure you have the right lens for the type of photo you want to take. If you’re not sure, consult the camera manual or ask a salesperson at the store where you bought your camera. Second, set up your camera in manual mode so that you have full control over the settings.
This may seem intimidating, but it’s actually quite easy once you get the hang of it. Consult your camera manual or look up tutorials online if you need help. Third, compose your shot carefully.
Take into consideration things like the rule of thirds and leading lines when framing your subject. Fourth, pay attention to lighting. Natural light is always best, but if you’re shooting indoors, try to avoid using flash as much as possible.
Instead, use other sources of light such as lamps or window light. Finally, don’t be afraid to experiment!
Taking photos with a DSLR (Digital Single-Lens Reflex) camera involves several key steps.
Here’s a general guide on how to take photos with a DSLR camera:
-
Turn On the Camera:
- Make sure your DSLR camera is powered on. Most cameras have a power switch or button.
-
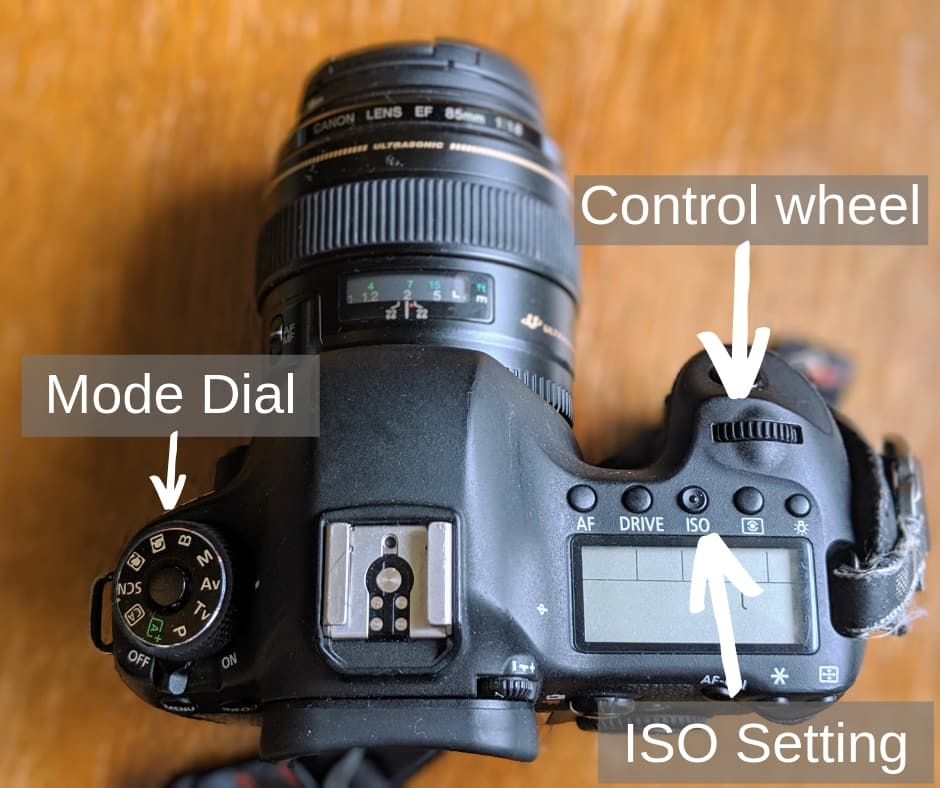
Select the Shooting Mode:
- DSLRs typically offer various shooting modes, such as Auto, Program (P), Aperture Priority (A/Av), Shutter Priority (S/Tv), and Manual (M). Choose the mode that best suits your shooting needs:
- Auto: The camera handles all settings automatically.
- Program: The camera sets the aperture and shutter speed, but you can adjust other settings.
- Aperture Priority: You set the aperture, and the camera adjusts the shutter speed for proper exposure.
- Shutter Priority: You set the shutter speed, and the camera adjusts the aperture.
- Manual: You have full control over all settings, including aperture, shutter speed, ISO, and more.
- DSLRs typically offer various shooting modes, such as Auto, Program (P), Aperture Priority (A/Av), Shutter Priority (S/Tv), and Manual (M). Choose the mode that best suits your shooting needs:
-
Set ISO Sensitivity:
- ISO determines the camera’s sensitivity to light. Lower ISO values (e.g., 100-400) are used in well-lit conditions, while higher ISO values (e.g., 800-3200) are used in low light. Select an appropriate ISO setting based on your lighting conditions.
-
Choose Aperture (in Aperture Priority or Manual Mode):
- If you’re in Aperture Priority or Manual mode, select your desired aperture (f-stop). Lower f-numbers (e.g., f/1.8) create a shallow depth of field, while higher f-numbers (e.g., f/16) result in a deeper depth of field.
-
Select Shutter Speed (in Shutter Priority or Manual Mode):
- If you’re in Shutter Priority or Manual mode, set your shutter speed. Faster shutter speeds (e.g., 1/1000 sec) freeze fast-moving subjects, while slower speeds (e.g., 1/30 sec) create motion blur.
-
Compose Your Shot:
- Use the camera’s viewfinder or LCD screen to frame your shot. Pay attention to composition rules like the rule of thirds, leading lines, and balance.
-
Focus the Image:
- Use the camera’s autofocus system or manually adjust the focus using the focus ring on the lens. Half-press the shutter button to activate autofocus, and wait for the focus confirmation (usually indicated by a beep or a green focus point).
-
Adjust Exposure (if necessary):
- Review the exposure meter in the viewfinder or on the LCD screen. Ensure the meter is centered (at 0) or adjust your settings if it indicates overexposure or underexposure.
-
Take the Shot:
- When you’re ready to capture the image, gently press the shutter button all the way down. For long exposures or tripod shots, consider using a remote shutter release or the camera’s timer function to minimize camera shake.
-
Review and Share:
- After taking the photo, review it on the camera’s LCD screen to ensure it meets your expectations. If necessary, adjust settings and retake the shot.
-
Transfer and Edit:
- Transfer your photos to a computer or device for further editing and sharing. You can use software like Adobe Lightroom, Adobe Photoshop, or free alternatives like GIMP for post-processing.
-
Backup Your Photos:
- Make sure to back up your photos to prevent loss. Use external hard drives, cloud storage, or other backup methods.
Remember that mastering DSLR photography takes practice. Experiment with different settings, compositions, and techniques to develop your skills and create the images you envision. Over time, you’ll become more comfortable and proficient in using your DSLR camera to capture stunning photos.
Video: Showing PHOTOGRAPHY BASICS in 10 MINUTES
How Do You Take a Picture With a Dslr?
DSLR cameras are becoming increasingly popular, and with good reason. They offer excellent image quality, advanced features, and the ability to interchange lenses. If you’re thinking about purchasing a DSLR or are already the proud owner of one, you may be wondering how to take advantage of all it has to offer.
Here’s a quick guide on how to take a picture with a DSLR camera. Before you start taking pictures, it’s important to become familiar with your camera’s buttons and controls. Spend some time playing around with the different settings and modes so that you understand what they do.
Once you have a good understanding of your camera, it will be much easier to take great photos. When you’re ready to take a photo, first make sure that your lens is attached and that the camera is in “Manual” mode. In this mode, you have complete control over all the settings including aperture, shutter speed, ISO, etc.
If you’re not familiar with these terms yet, don’t worry – we’ll go over them in more detail later on. For now, just know that Manual mode gives you the most control over your photo and results in the best quality image possible. Once your camera is in Manual mode, use your viewfinder or LCD screen to compose your shot.
When you’re ready to take the photo, gently press down on the shutter button halfway until you see an indication that focus has been achieved (this will vary depending on your camera model). Then without moving the camera or taking your finger off the shutter button ,press it all the way down to take the photo . For most people new to DSLR photography ,the hardest part is nailing exposure every time they press click .
Exposure refers To get correct exposure ,you need strike a balance between three elements :aperture ,shutter speed ,and ISO .These three elements work together to determine how light or dark an image will appear once captured .Aperture refers To The size of hole inside lens when snapping away( expressed in f -numbers like f/2 .8) .
How Do I Take Pictures With My Canon Dslr?
Assuming you would like tips on how to take better photos with your Canon DSLR: Here are 10 Tips for Taking Better Photos with Your Canon DSLR:
1. Use the right lens
The kit lens that comes with your Canon DSLR is a great starting point, but it’s not going to help you capture amazing photos all by itself. If you’re serious about photography, invest in some good quality lenses that will help you get the shots you want.
2. Get familiar with your camera’s controls
Before heading out to take pictures, spend some time getting familiar with your camera’s controls and functions. That way, when you’re ready to shoot, you’ll know exactly what each button does and won’t have to waste time fiddling with the camera while trying to compose a shot.
3. Use manual mode
If you really want to take control of your photos, ditch the auto mode and switch to manual. This will allow you to adjust things like shutter speed, aperture and ISO so that you can get exactly the look and feel that you’re going for in your photo. It takes a bit of practice to master manual mode, but it’s well worth it if you want full creative control over your images.
4. Shoot in RAW format
If your camera gives you the option of shooting in RAW format (as opposed to JPEG), definitely do it! RAW files contain much more information than JPEGs and give you much more flexibility when editing later on.
They do take up more space on your memory card, but trust me – they’re worth it!
How Do I Use My Camera to Take Good Pictures?
There are a few things you need to know in order to take good pictures with your camera. First, you need to know how to hold the camera correctly.
You should hold it with both hands, and keep your arms close to your body. This will help keep the camera steady and avoid blurry pictures. Second, you need to know how to focus the camera.
Most cameras have an auto-focus feature, but if yours doesn’t, you’ll need to learn how to manually focus the lens. Third, you need to be aware of the lighting conditions. If it’s too dark, your pictures will be grainy; if it’s too bright, they will be washed out.
Try taking pictures at different times of day or in different types of light (e.g., natural light versus artificial light) until you get a feel for what works best. Finally, don’t be afraid to experiment! Play around with different settings and see what results you get.
With practice, you’ll soon be taking great pictures!
How Do I Take Pictures With Dslr on My Phone?
Taking pictures with a DSLR camera using your phone typically involves connecting the DSLR to your smartphone and remotely controlling it via a dedicated mobile app or software. Here are the general steps to take pictures with a DSLR using your phone:
Requirements:
- A DSLR camera that supports remote control via a mobile app or software.
- A compatible smartphone with the required app or software installed.
- A stable Wi-Fi or Bluetooth connection between your phone and the camera.
Steps:
-
Camera Setup:
- Ensure your DSLR camera is compatible with remote control via a mobile app. Many modern DSLR models have this capability, but older models may not support it.
- Make sure your camera’s firmware is up to date, as manufacturers often release updates to improve compatibility and functionality.
-
Download and Install the App:
- Search for and download the official mobile app provided by your camera’s manufacturer. Examples include “Canon Camera Connect” or “Nikon SnapBridge.” Install the app on your smartphone.
-
Enable Wi-Fi or Bluetooth on the Camera:
- On your DSLR camera, access the settings menu and enable Wi-Fi or Bluetooth, depending on the connection method supported by your camera model.
-
Connect Your Phone to the Camera:
- Open the camera app on your smartphone and follow the on-screen instructions to connect to your camera’s Wi-Fi or Bluetooth network. You’ll typically need to select your camera’s name from the available devices and enter any required passwords.
-
Launch the Camera App:
- Open the camera app on your smartphone. It should automatically detect and connect to your DSLR.
-
Remote Control and Capture:
- Once your phone is connected to the camera, you can use the mobile app to remotely control various camera functions, including:
- Adjusting settings such as aperture, shutter speed, ISO, and focus.
- Composing the shot by viewing the live image feed from the camera on your phone’s screen.
- Taking photos remotely by tapping a shutter button within the app.
- Once your phone is connected to the camera, you can use the mobile app to remotely control various camera functions, including:
-
Capture Photos:
- Use the app’s interface to set up your shot, adjust exposure settings, and focus as needed.
- When you’re ready to take a photo, press the virtual shutter button within the app.
-
Review and Save:
- After capturing the photo, you can typically review it on your phone’s screen. Some apps may also allow you to save the image directly to your phone’s gallery or camera roll.
-
Disconnect and Exit:
- When you’re finished, disconnect your smartphone from the camera within the app, and exit the app on both your phone and the camera.
-
Transfer and Edit:
- If desired, transfer the photos from your DSLR to your phone for further editing or sharing using the app’s built-in transfer function.
Remember to consult your camera’s user manual and the specific instructions provided by the manufacturer’s app for detailed information on using remote control features. The steps and features may vary slightly depending on your camera’s brand and model.
Credit: www.findingtheuniverse.com
How to Use a Camera for Photography
Whether you’re a seasoned photographer or just getting started, understanding how to use your camera is essential to taking great photos. Here are a few tips on how to use a camera for photography:
1. Choose the right camera.
There are many different types of cameras available on the market, so it’s important to choose one that suits your needs. If you’re just starting out, a point-and-shoot camera may be all you need. For more advanced photographers, a DSLR (digital single-lens reflex)camera offers more features and flexibility.
2. Learn the basics of composition.
A good photo isn’t just about what you’re photographing, but also how you photograph it. Composition is the arrangement of elements in a photo, and there are several guidelines you can follow to help make your photos look their best.
One of the most important things to remember is the rule of thirds: imagine your photo divided into thirds horizontally and vertically, and try to position your subject at one of the intersections or along one of the lines. This will help create balance and interest in your photos.
3. Don’t afraid to experiment.
‘t be afraid to experiment with different settings on your camera or different compositions—that’s part of the fun of photography! Play around until you find what works best for you and have fun with it!
How to Make Dslr Photos Look Professional
Are you looking to take your DSLR photography to the next level and make photos that look professional? If so, there are a few things you can do to help achieve this goal. First, invest in some quality lenses.
The kit lens that comes with your camera is likely not going to cut it if you’re serious about making pro-level photos. Second, learn how to use all of your camera’s features and settings. This may seem like a no-brainer, but many people who own DSLRs never even crack open the manual or explore beyond the auto mode.
Third, take the time to edit your photos after you’ve shot them. This can be done with basic editing software like Adobe Photoshop or Lightroom, or even with free online tools like PicMonkey. And fourth, practice, practice, practice!
The more you shoot, the better you’ll become at getting those stunning shots that will wow everyone who sees them.
How to Take Good Photos With a Digital Camera
In order to take good photos with a digital camera, there are a few things that you need to keep in mind. First, you need to make sure that the camera is steady and not moving around too much. Second, you need to make sure that the lens is clean and free of any smudges or fingerprints.
Third, you need to be aware of the lighting conditions and adjust the settings on your camera accordingly. Finally, when taking the actual photo, be sure to compose it well and pay attention to detail. By following these simple tips, you should be able to take great photos with your digital camera!
Conclusion
Dslr cameras are becoming increasingly popular, and with good reason. They offer excellent image quality, advanced features, and in many cases, are much more affordable than their mirrorless counterparts. In this article, we’ll show you how to take photos on dslr cameras so that you can get the most out of your investment.
We’ll start by discussing some of the basics of photography, including shutter speed, aperture, and ISO. Once you have a solid understanding of these concepts, we’ll move on to more specific tips for taking great photos with your dslr camera. We’ll cover topics like composition, lighting, and exposure so that you can capture stunning images every time you press the shutter button.
With a little practice and our helpful tips, you’ll be taking amazing photos with your dslr camera in no time!

