
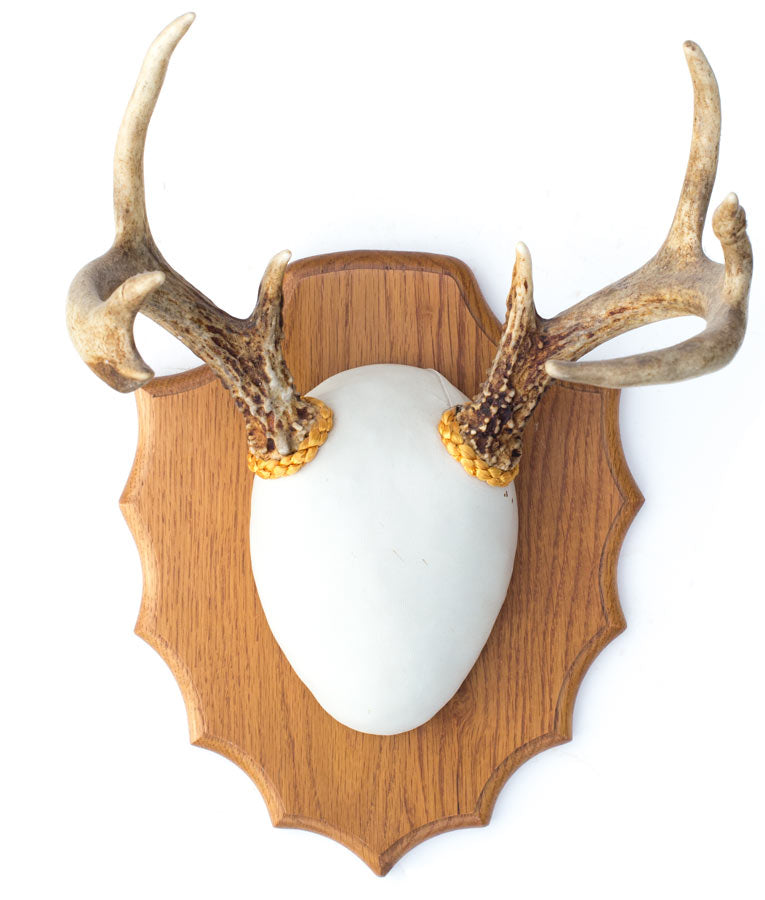
To mount deer antlers without a skull, you’ll need a mounting plaque and antler mounting kit. Secure the antlers to the plaque using the bracket system provided in the kit.
Mounting deer antlers can be a proud display of a successful hunt or a rustic aesthetic addition to home decor. With the right tools and a bit of craftiness, showcasing these natural trophies is straightforward. The process typically involves a mounting plaque, which comes in various shapes and styles to complement different interior designs.
Antler mounting kits are readily available and usually contain all necessary hardware, including a bracket, screws, and a cover for the antler bases. This way of display keeps the antlers in good condition, emphasizes their natural beauty, and doesn’t require the entire deer skull, which might be a preference for ethical or practical reasons. Whether for a hunting cabin or a suburban living room, mounted antlers add a touch of wilderness charm.

Credit: www.amazon.com
Introduction To Diy Deer Antler Mounting
Have you ever admired the majestic antlers of a deer and imagined them displayed on your wall? You’re not alone. Many people find beauty in showcasing these natural trophies. But what if you could mount them yourself? Enter the world of DIY deer antler mounting. This handy skill allows you to create personalized displays without needing the entire skull. We’ll guide you through the steps to achieve a stunning mount using simple tools and materials. Ready to turn those antlers into a proud centerpiece? Let’s get started.
The Appeal Of Trophy Displays
Deer antler mounts are not just about the hunt; they’re a nod to nature’s splendor. Hunters and outdoor enthusiasts alike appreciate the unique story each set of antlers tells. A DIY mount lets you preserve and honor that tale. Moreover, it can serve as a conversation starter, adding rustic charm and character to any room.
Ethical Considerations
When creating deer antler displays, ethical practices must take center stage. It’s essential to source antlers responsibly. Always confirm that your antlers come from legal and ethical hunts. Or, better yet, use shed antlers found in the woods. These naturally dropped antlers provide a guilt-free way to indulge in your crafting passion. They ensure the beauty of wildlife graces your home without harm.

Credit: www.amazon.com
Materials Required For Antler Mounting
Transforming deer antlers into a captivating wall display requires precise materials and tools. This guide details everything needed to showcase antlers without the skull attached. A well-prepared mounting not only honors the animal but also creates a rustic and natural decor piece for any home or cabin.
Tools And Equipment
Proper tools ensure a smooth mounting process. Collect these items before starting:
- Drill: To make pilot holes for attaching antlers to the plaque.
- Screws: Use durable screws to secure antlers firmly.
- Wire cutters and Pliers: For trimming and adjusting any wire used in mounting.
- Measuring Tape: Measurements are crucial for symmetrical display.
- Safety Gear: Gloves and glasses to protect hands and eyes.
Selecting A Mounting Plaque
Choose a plaque that complements the antlers. Here are some tips:
- Material: Options include wood, metal, or synthetic plaques.
- Size: The plaque should balance the antler size for aesthetic appeal.
- Shape: Oval, shield, and rectangular shapes are popular choices.
- Color: Select a color that highlights the antlers’ natural beauty.
Supplies For Finishing Touches
To achieve a polished look, include these finishing supplies:
- Felt or Fabric: Covers the backside of the antlers for a neat presentation.
- Mounting Hardware: For hanging the antlers on the wall with ease.
- Adhesive: Glue or bonding agent secures felt and stabilizes the mount.
- Stain or Sealant: Enhances and protects the mounting board.
- Decorative Tacks: Adds an elegant touch around the edges of the felt.
Preparing Antlers For Mounting
Mounting deer antlers is a proud way to display a successful hunt. They serve as a rustic decoration and a memoir of the experience. Preparing antlers for mounting is essential. Proper preparation ensures lasting quality and the best presentation on your wall. Let’s walk through the steps of preparing antlers for mounting starting with cleaning and skinning, followed by preserving the antler condition.
Cleaning And Skinning
Begins by removing any flesh or skin from the antlers. This is crucial to prevent decomposition and odors. Gloves are recommended for this process. Start skinning near the base and work upwards with a sharp knife. Ensure all tissue is removed. After skinning, wash the antlers with soapy water. A brush can help remove debris from crevices. Rinse thoroughly and pat dry with a towel.
- Wear gloves to protect hands.
- Use a sharp knife for skinning.
- Wash with soapy water post-skinning.
- Brush out debris from hard-to-reach spots.
- Rinse and dry the antlers carefully.
Preserving The Antler Condition
After cleaning, preserving the antlers is next. Start by sanding any rough spots with sandpaper. Sanding gives a smooth finish. Apply a coat of wood sealer or varnish. This step protects the antlers from moisture and insects. Choose a matte finish for a natural look or a gloss finish for shine. Allow the antlers to dry completely before proceeding to mount.
| Step | Action | Note |
|---|---|---|
| 1. Sealing | Sanding | Smooth the antler surface. |
| 2. Protecting | Applying wood sealer/varnish | Protects from moisture and insects. |
| 3. Drying | Let it dry | Ensure it’s dry before mounting. |
Credit: www.masterofskulls.com
Assembling Your Mount
Welcome to the hands-on guide for immortalizing your trophy antlers. Let’s dive into the exciting journey of assembling your mount. Rest assured, it’s a technique you can master with some patience and our step-by-step instructions. Breathe new life into your prized antlers by showcasing them beautifully.
Attaching Antlers To The Plaque
You must select a plaque that complements your antlers. With the right plaque in hand, center your antlers on it to mark the drill points. Use a drill to create holes on the plaque according to your markings.
Next, align the antlers with the drilled holes. Secure them using bolts or screws that fit tightly. It’s essential to ensure they are snugly attached with no room for wobbling.
Securing The Antlers For Longevity
The longevity of your mount significantly depends on the securing process. Use strong adhesives like epoxy resin to reinforce the bond between antlers and plaque.
- Apply the adhesive thoroughly where the antlers touch the plaque.
- Allow it to cure, following the adhesive’s given dry time for a robust set.
- Consider adding a backer board for extra stability, especially for larger antlers.
Maintain your mount’s look by keeping it in a stable environment.
Direct sunlight and moisture are not friends to your antler mount. Keep it indoors, away from harsh elements to preserve its grandeur.
With these tips, your antlers will stand the test of time, attached securely to their display, ready to tell their story.
Artistic Considerations
Mounting deer antlers showcases respect for the animal and admiration for the outdoors. Artistry blends with tradition in this practice. Thoughtful presentation turns antlers into a room’s focal point. Read on for tips on selecting a style and personalizing your antler display.
Choosing A Style For Your Mount
Consider the décor where the antlers will hang. Align the mount style with the room’s theme. A rustic cabin may call for a natural look. A modern space might benefit from a sleek, minimalist mount. The antler size guides the mount size. Match small antlers with modest mounts. Large antlers require robust supports. Visual balance is key.
- Traditional plaque: Classic wood or metal, often shaped like a shield.
- Skull replica mount: Gives the illusion of a full skull without extra weight.
- Panel mount: Rectangular or oval, these add a formal touch.
- European mount: Focuses on the antlers, with no backing.
Adding Personal Touches
Your mount should reflect personal experiences and tastes. Engrave plaques with dates or locations of the hunt. Include a photo from the day for sentimental value. Embellish mounts with items found during the hunt, like leaves or stones.
- Engraved plaques: Add names, dates, or special messages.
- Themed decorations: Use natural elements for a unique twist.
- Color accents: Paint or stain the mount to match room colors.
- Photo integration: Connect memories to the visual display.
Final Steps And Display Suggestions
After carefully preparing the antlers, the time has come to showcase your trophy elegantly. The final steps include not just securing the antlers, but also deciding on the best way to display them. The right display can transform a simple set of antlers into a stunning centerpiece of any room.
Mounting On The Wall
For a classic display, wall mounting is a top choice. Follow these steps:
- Pick the right spot on the wall where the antlers can shine.
- Use a sturdy mount that can support the antlers’ weight.
- Measure and mark where the screws will go.
- Drill pilot holes slightly smaller than the screws.
- Secure the mount with screws, and attach the antlers.
An antler mount kit can simplify the process. These kits come with hardware and a mounting plate, making the display effortless and secure.
Maintaining Your Antler Mount
Proper maintenance ensures your mount remains pristine. Dust the antlers regularly with a soft brush. Keep them away from moisture and direct sunlight to prevent damage.
- To clean, use a mild soap and water mixture.
- Gently wipe with a damp cloth, avoiding harsh chemicals.
- Dry immediately with a soft, dry cloth.
Consider adding a natural wax or polish once in a while to enhance the antlers’ luster. This simple care routine will keep your antlers looking like new for years to come.
Frequently Asked Questions For How To Mount Deer Antlers Without Skull
Can You Mount Deer Antlers Without The Skull?
Yes, deer antlers can be mounted without the skull by using a plaque or a synthetic skull. Mounting hardware allows you to attach the antlers securely. The process involves cleaning the antlers and attaching them to the mount of choice.
What Materials Are Needed For Mounting Antlers?
Materials for mounting antlers typically include a mounting plaque, screws, drill, borax, and sometimes a synthetic skull or antler kit. You may also need wire and a saw if adjustments are necessary. Choose a plaque that complements your antler size and room decor.
How Long Does Mounting Antlers Take?
Mounting deer antlers can take a couple of hours to complete. The exact time will depend on your experience level and the method used. Preparation time, such as cleaning the antlers and letting them dry, must also be considered.
Is It Necessary To Treat Deer Antlers Before Mounting?
Treating antlers before mounting is advisable. It involves cleaning them and applying a preservative like borax. This step prevents decay and insect infestations, ensuring the antlers remain in good condition for a longer time.
Conclusion
Mounting deer antlers without a skull is a rewarding DIY challenge. This guide has walked you through each step, ensuring you can display your trophy with pride. Remember to measure carefully, choose the right plaque, and secure the antlers firmly.
Share your magnificent handiwork with friends or fellow enthusiasts and enjoy the fruits of your craftsmanship for years to come.

